Notification Management
 Module : Notifications
 Path: Processing > Notifications > Notification Management
Topic : Notification Management
Version(s) : Version 5.1 and up
Editions: Commerce & Call Center
What Is Notification Management
This is where you can create custom notifications for sales or leads based on various "triggers" including item statuses, cs activities and different script dispositions. Notifications must be setup prior to an event triggering. You cannot send notifications based on events that completed before setup.
Making The Connection
Where Will I See This Within OLX?
You will see notifications on the Customer Detail Page Customer Detail Page (orderlogix.com) and under Process History for Job Type contains Notification.
What Reports Can Be Pulled?
- at this time there are no reports
What Imports/Exports Relate to Notifications
- at this time there are no imports/exports
Trouble Shooting
Customer is not receiving notifications
- Check the customer record to see what the No Soliciting setting is set to
- True will keep notifications from sending to this customer
- False will allow notifications to send to this customer
- Check the Notification Management to make sure the scripts are selected correctly
- Check the Automated Delivery schedules to confirm a Prepare Only schedule is running as often as your notifications are scheduled to send
Notification Management
Edit Defaults
- Click the
Edit Defaults link in the Notification Config module and a new Notification Default and Preview Details window will pop up.
- Select the "Notification Type", you can choose call, lead or, sale from the drop-down list.
- Edit the Preview Value and Default value for each alias you want to change.
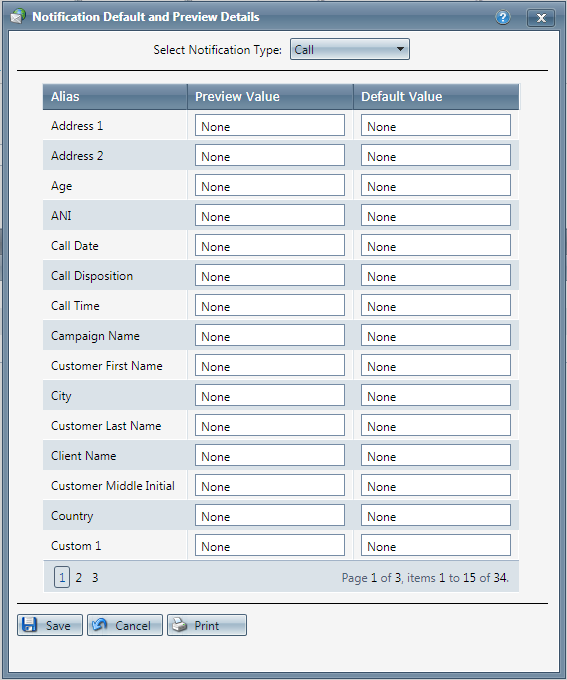
- Click the
 Save Button to save the Notification Defaults and the Preview Details window will close.
 - To cancel any of the current changes you have made, click the
 Cancel button.
 - This will close the Notification Defaults window without saving any changes.
- To print the current Notification Defaults window, click the
 Print button.
Email Profile
Click the  Edit Preferences link in the Notification Config module and a new Notifications Preference window will pop up. All fields are required to have a working Email Profile.
- Client
- Profile Name: This is customizable to your organization.
- It is recommended to relate this to what the profile will be used for within OLX.
- Outbound Server: The e-mail server you use to send company e-mail.
- smtp.sendgrid.net
- smtp.gmail.com
- smtp.protonmail.ch
 Note, this will need to be whitelisted through the OrderLogix IT department before you can successfully send emails via that server address.
If using SendGrid please refer to setup instructions found HERE - Outbound Port Your mail provider can provide this information for you
- Most mainstream SMTP servers utilize 587
- Inbound Server The e-mail server you use to send company e-mail.
- Inbound Port Your mail provider can provide this information for you
- Most mainstream SMTP servers utilize 995
- Login: User login information
- Password: User Password
- Confirm Password: Reenter User Password
- From (default): The return address as it appears on the e-mail.
- Auth Mechanism:
- UserPassword
- CRAMMD5 - challenge–response authentication mechanism
- NTLM
- Kerberos
- Is Active:
- Check this box to activate
- Uncheck to deactivate profile
- Click the Save Button to save the Notification Preferences and the window will close.
- To cancel any of the current changes you have made, click the
Close button.
- This will close the Notification Preferences window without saving any changes.
- To test your setup, click the
Send Test Email button.
- enter the email address to send test notification to
- click send to send
- click close to close the popup without sending test notification
- To delete an existing profile, click the
 delete button.
Prepare Notifications
Click the  Prepare Notifications link in the Notifications Config module in order to merge all of the customer specific alias information into the templates created.
The Prepare Notifications window will appear.
- Template
- Script Name
- Delivery Method
- All Methods
- Email
- Internal
- Type Code
- All Types
- Autoship
- Call
- Lead
- Sale
- Start Date
- End Date
- Click
 Apply Filter to apply the sort.
 - Count - how many notifications will be prepared for the template via the selected script and delivery/type.
- To select the templates to prepare, check the checkbox next to the template name.
- Select
 Prepare to process the selected notifications.
 - Select
 Prepare All to prepare all notifications.
 - You will receive the following alert:
-
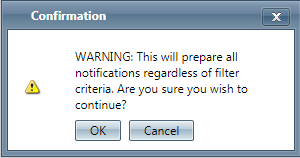
If you use the Prepare All button this will ignore the filters and options selected/not selected. ALL available notifications in the system will prepare.
- Click OK to finish the prepare job.
- You will then see the output in the job log regarding how many notifications were prepared, as well as if there were any that could not be.
- To cancel any of the current changes you have made, click the Cancel button.
- This will close the Notification Preparation window without saving any changes.
- To print the current Notification Preparation window, click the Print button.
Send Email/API
Click the  Send Emails link in the Notifications Config module.
The Send Emails window will appear, which is the process that takes the prepared emails that were successful then batches and sends them out to the customers.

Note, when handling internal notifications, the prepare job automatically sends them to the internal call back queue. This send job is strictly to send out emails.
- Template
- Script Name
- Type Code
- All Types
- Autoship
- Call
- Lead
- Sale
- Start Date
- End Date
- Click Apply Filter to apply the sort.
- Count - how many notifications will be sent for the template via the selected script and delivery/type.
- To select the templates to prepare, check the checkbox next to the template name.
- Click the
send button to send the notifications selected
- Click the
 send all button to send everything that was prepared.
 - You will receive the following alert:

If you use the Send All button this will ignore the filters and options selected/not selected. ALL available notifications in the system will send.
- click OK to send the notifications
- You will then see the output in the job log regarding how many notifications were sent, as well as if there were any that could not be.
- To cancel any of the current changes you have made, click the Cancel button.
- This will close the Notification Send window without saving any changes.
- To print the current Notification Send window, click the Print button.
Purge Notifications
Click the Purge Notifications link in the Notifications Configuration Module.
The Purge Notifications window will appear, which is the process that allows you to delete old emails through a specific date that may not have been sent for some reason.
- Notification Type
- All Notifications - will display all available options from the Prepare Notification window and the Send Email/API window
- Unprepared Notifications - will display available options from the Prepare Notification window
- Unsent Notifications - will display available options from the Send Email/API window
- Start Date
- End Date
- Click Apply Filter to apply the sort.
- Template
- Script Name
- Delivery Method
- Email
- Internal
- Status
- Unprepared - if purged will remove available options from the Prepare Notification window
- Unsent - if purged will remove available options from the Send Email/API window
- Count - how many notifications will be purged for the template via the selected script and delivery/status.
- To select the templates to purge, check the checkbox next to the template name.
- Click the
delete button to send the notifications selected
- You will receive the following alert:
- click ok
- Click the
delete all button to send everything that was prepared.
- You will receive the following alert:
If you use the Delete All button this will ignore the filters and options selected/not selected. ALL available notifications in the system will be deleted.
- click OK to delete the notifications
- You will then see the output in the job log regarding how many notifications were Purged, as well as if there were any that could not be.
- To cancel any of the current changes you have made, click the Cancel button.
- This will close the Purge Notification window without saving any changes.
- To print the current Purge Notification window, click the Print button.
Automated Delivery
*New Feature Coming Soon*
Notifications Graph
*New Feature Coming Soon*
Please note the displayed label of the slider denotes the data provided, not the color of the slider
Daily/Sent
Displays how many notifications were sent on the given date:
Daily/Failed
Displays how many notifications failed to send on the given date:
Hourly/Sent
Displays how many notifications were sent on the given hour:
Hourly/Failed
Displays how many notifications failed to send on the given hour:
- numbers on left side of the graph are the count of notifications sent/failed
- the bottom numbers are the days/hours that the notification(s) sent/failed
- toggle buttons can be used to switch between daily/hourly and sent/failed
- each template will display on the graph in a different color
- the right side of the graph displays a legend with the template name and color displayed on the graph
Unsent Notifications Graph
*New Feature Coming Soon*
The Legend should contain Template names, and the values should represent UNSENT (and/or UNPREPARED) notifications. I think it's ok to group Unsent & Unprepared notifications together as one number. They both represent notifications that will be eventually be sent.
The purpose of this graph is to show what notifications are building up in the system... that have not been fully delivered yet. If there are no UNPREPARED/UNSENT notifications at all, you can just display a solid white pie with no separate parts... and the Legend can just contain a single entry that says "All notifications sent"
Notification Event Configuration
Script Disposition
When navigating to the management section, you will automatically be defaulted to the "Script Disposition" tab. These notifications allow you to trigger an internal notification to call a customer back, or send an email based on a call not converting to a sale.
Filter
You can use the filter options to narrow down the displayed selections.
- #Scripts
- Delay Time
- Delivery Method
- Disposition
- Template
Add additional filters by click the Add button 
Apply the filtered selections by clicking Apply Filter 
Remove the filtered selections by clicking Remove Filter 
You can set the number of records to be displayed
Add New Script Disposition Notification
Click the  'Add New Script Disposition Notification' button and a new Script Disposition Notification Details window will pop up.
'Add New Script Disposition Notification' button and a new Script Disposition Notification Details window will pop up.- Select the Disposition from the Disposition drop-down list.
- Move the script(s) that will trigger the notification template from the Available Scripts to the Selected Scripts.
- Select the delivery method
- Email - this will send to your customers
- can be applied to a Sale or Lead template for a Sale disposition,
- or a Lead Template for any "non-sale" disposition.
- Internal - this will need to be applied to a Queue Template which will then filter any of the dispositioned calls into that queue for call back.
- From the Notification Template drop-down list, select the template you want to add.
- enter a delay time if applicable or leave 0 - this how long the system will wait to send notification once the above criteria have been triggered.
- Select the type of delay time:
- Minutes
- Hours
- Days
- Weeks
- Click the Save Button to save the script disposition notification template.
- To cancel any of the current changes you have made, click the Cancel button.
- This will close the Script Disposition Notification Details window without saving any changes.
- To delete an existing notification click the delete button.
- To print the current Script Disposition Notification Details window, click the Print button.
Item Status
Filter
You can use the filter options to narrow down the displayed selections.
- # Scripts
- Delay Time
- Delivery Method
- Item Status
- Template
Add additional filters by click the Add button
Apply the filtered selections by clicking Apply Filter
Remove the filtered selections by clicking Remove Filter
You can set the number of records to be displayed
Add New Script Item Status Notification
Click the 'Add New Script Item Status Notification' button and a new Script Item Status Notification Details window will pop up.
'Add New Script Item Status Notification' button and a new Script Item Status Notification Details window will pop up.- Move the script(s) that will trigger the notification template from the Available Scripts to the Selected Scripts.
- Select the item status
- Select the delivery method
- Email - this will send to your customers; can ONLY be applied to Sale templates for item status notifications.
- Internal - this will need to be applied to a Queue Template which will then filter any of the dispositioned calls into that queue for call back.
- From the Notification Template drop-down list, select the template you want to add.
- enter a delay time if applicable or leave 0 - this is how long the system will wait to send notification once the above criteria have been triggered.
- Select the type of delay time:
- Minutes
- Hours
- Days
- Weeks
- "Exclude Autoships"
- Check if you do not want the notification to be delivered for continuity orders.
- Uncheck to deliver on continuity orders
- "Include ONLY Autoships"
- Check if you want a specific notification to be delivered for only continuity orders.
- Uncheck if you want notification to be delivered for all order types.
- "Exclude Installments"
- Check if you do not want the notification to be delivered for each multi-pay offer on the order that ends up in the eligible status.
- Uncheck if you want notification to be delivered for all order types.
- "Exclude Set Items"
- Check if you do not want the notification to be delivered for each item that is on the order as a set.
- Uncheck if you want notification to be delivered for all order types.
- "Cancel if Item Status Changes:"
- Check if you do not want the notification to be delivered if the status of the item changes.
- Uncheck if you want the notification to be delivered regardless of if there has been a change to the item status.
- Click the Save Button to save the item status notification template.
- To cancel any of the current changes you have made, click the Cancel button. This will close the item status Notification Details window without saving any changes.
- To delete an existing notification, click the delete button.
- To print the current item status Notification Details window, click the Print button.
Customer Service Activity
Filter
You can use the filter options to narrow down the displayed selections.
- # Scripts
- CS Activity
- Delay Time
- Delivery Method
- Template
Add additional filters by click the Add button
Apply the filtered selections by clicking Apply Filter
Remove the filtered selections by clicking Remove Filter
You can set the number of records to be displayed
Add New Customer Service Activity Notification
Click the 'Add New Customer Service Activity Notification' button and a new Customer Service Activity Notification Details window will pop up.
'Add New Customer Service Activity Notification' button and a new Customer Service Activity Notification Details window will pop up.- Move the script(s) that will trigger the notification template from the Available Scripts to the Selected Scripts.
- Select the CS Activity
- Select the Reason Code
- Note that if you are selecting a manual CS Activity code rather than a "SYS:" code, this field will be defaulted to "All Reason Codes."
- Select the delivery method
- Email - this will send to your customers; can ONLY be applied to a Sale templates.
- Internal - this will need to be applied to a Queue Template which will then filter any of the dispositioned calls into that queue for call back.
- From the Notification Template drop-down list, select the template you want to add.
- enter a delay time if applicable or leave 0 - this is how long the system will wait to send notification once the above criteria have been triggered.
- Select the type of delay time:
- Minutes
- Hours
- Days
- Weeks
- Click the Save Button to save the CS Activity disposition notification template.
- To cancel any of the current changes you have made, click the Cancel button. This will close the CS Activity Notification Details window without saving any changes.
- To delete an existing notification click the delete button.
- To print the current CS Activity Notification Details window, click the Print button.
Dropped Call
This tab is only available in Call Center Edition
Filter
You can use the filter options to narrow down the displayed selections.
- # DNIS
- Campaign
- Client
- Queue Name
- Queue Template
Add additional filters by click the Add button
Apply the filtered selections by clicking Apply Filter
Remove the filtered selections by clicking Remove Filter
You can set the number of records to be displayed
Add New Dropped Call Notification
Click the 'Add New Dropped Call Notification' button and a new Dropped Call Notification Details window will pop up.
'Add New Dropped Call Notification' button and a new Dropped Call Notification Details window will pop up.- select the Client from the drop down
- select the Campaign from the drop down
- list will filter off Client selected above
- Queue from the drop down
- Queue Template from the drop down
- list will filter off Queue selected above
Notification Management
Copyright 2019
Revised 12.27.2024
Related Articles
Notification Templates
Module: Notifications Path: Processing > Notifications > Notification Template Topic: Notification Set up Version(s): Version 5.1 and up Editions: All Editions What Are Notifications Are programmable system communications between you and your agents ...5.1.13 - Notification Improvements
Version: 5.1 Patch: 013 Title: Notification Improvements Application Category: Other Patch Type: Feature Description: The internal notification queue (seen on CS and Sales overview pages) now launches in an integrated window and has in improved look ...Notification Calling Profiles
Module : Notifications Topic : Notification Calling Profiles Version(s) : Version 5.1 and up Editions : All Editions Navigate to the Notification Calling Profiles module of the Notification Management screen from the Company Data menu. (Company Data ...Dunning Letter Notification
Module: Dunning Letters Processing > Notifications > Dunning Letter Notifications Topic: Dunning Letters Notification Version(s): 5.1 Editions: All What Is A Dunning Letter Dunning Letters are notifications that an account is delinquent and the ...R21 p5 - Notifications management screen enhancements
Version: 5.1 Release Number: 21 Patch: 5 Title: Notifications management screen enhancements Application Category: Other, Notifications Patch Type: Feature Description: Created summary tiles on the Manage Notifications screen and added two charts to ...