Sales Order Entry

Module: Sales Order Entry
Path: Sales > Enter A New Sale
Topic: Page Overview
Version(s): Version 5.1 and up
Editions: All
What Is Sales Order Entry?
Sales Order Entry is where agents can manually enter an order into OrderLogix.
Making The Connection
Where Will I See This Within OLX?
The order entry page is the only place you will see this in OrderLogix.
Sales > Enter A New Sale or by clicking on the main Sales menu
What Reports Can Be Pulled?
What Imports/Exports Relate to Sales Order Entry
- at this time there are no imports/exports related to manually entered sales
TroubleShooting
Process button is greyed out
- the process button will remain greyed out until there is an offer added to the order that requires a preauthorization. If you are not preauthing the product offers you will submit the order as a sale and skip processing.
Tax isn't calculating
- confirm the shipping address is completed
- confirm the shipping state is selected on Manage Scripts: Region/Taxes tab
- if using an external tax vendor confirm settings on their setup for the shipping state
Sim Order Entry
If utilizing Script > Forms, the agents will not see the below view and the information listed in the rest of the article will be of no use. SIM Order Entry is unique to each script and depends on the setup of each form.
Things to note for SIM Order Entry:
- you must have a call type set in order to disposition out of the order screen
- shipping address must be collected before tax will calculate
- all offers must be selected before creating preauthorization if you wish to have a single transaction per order
- call must be dispositioned as a Sale for order to create
Classic Order Entry R21 and Later
Use the Sales Order Entry Screen to log a call or enter a sale when you are talking to a customer.
 Note: This manual call/order entry step does not occur if you are using the CTI feature in OrderLogix, because the system automatically brings you to the proper script.
DNIS, Promo Code or Source Name
Navigate to Sales > Enter A New Sale or by clicking on the main Sales menu
- Select an option from the Choose Source dropdown - System Preference is where you will set the default option for this area
- DNIS ***must already be configured as a source in OLX***
- Promo ***must already be configured as a Promo in OLX***
- if Promo code is associated to more than one source a popup will display allowing agent to select source to create order against
- Source ***must already be configured as a source in OLX***
- Enter the value of Source option selected
- Enter the ANI if available (Customers telephone #) and
- Click the
 go button.
Finder File
Navigate to Sales > Enter A New Sale
You cannot get here by clicking on the main Sales menu
- Enter either:
- Last Name and Zip Code (First Name can be used to help narrow down the returned records)
or - Finder #
- Click Lookup
- Click Go
beside the customer you are creating the order for
- Select a DNIS from drop down
- Options displayed here will be based off the associations to the Finder File Customer Record selected in step 3
- Enter ANI if available (Customers telephone #)
- You can Choose again
if you selected the wrong customer record and need to select a new record
- Click Go
- The Order Entry screen will appear with the Customer Information already filled in
- Navigate to Place Order below
Place Order R21 and later
Order Entry Information
- DNIS - this connects the order to a source in OLX
- ANI - this is the call back information for the customer
- Date - day of order/time of order
- Timer - how long the order took to place
Customer Billing Information
The Bill radio button will be selected to denote Billing Address information

Shipping address must be completed in order to calculate taxes
If entering an international address, you will need to check the box accordingly (this must be allowed at the script level)
- Company - this is not a required field
- Name (This will be completed if using Finder File Lookup)
- First - this is a required field
- Middle Initial - this is not a required field
- Last - this is a required field
- Address - this is a required field (This will be completed if using Finder File Lookup)
- Address 2 - this is not a required field
- City - this is a required field (This will be completed if using Finder File Lookup)
- State - this is a required field (This will be completed if using Finder File Lookup)
- Zip - this is a required field (This will be completed if using Finder File Lookup)
- Country - this is a required field (This will be completed if using Finder File Lookup)
- Phone# - this is a required field
- PM # - this is not a required field
- Email Address - this is a required field if set as such on the script
- Copy to Shipping button
a handy short cut if the billing information is the same for the shipping information
Customer Shipping Information
The Ship radio button will be selected to denote Shipping Address information
If entering an international address, you will need to check the box accordingly (this must be allowed at the script level)

Shipping address must be completed in order to calculate taxes
- Company - this is not a required field
- Name (This will be completed if using Finder File Lookup)
- First - this is a required field
- Middle Initial - this is not a required field
- Last - this is a required field
- Address - this is a required field (This will be completed if using Finder File Lookup)
- Address 2 - this is not a required field
- City - this is a required field (This will be completed if using Finder File Lookup)
- State - this is a required field (This will be completed if using Finder File Lookup)
- Zip - this is a required field (This will be completed if using Finder File Lookup)
- Country - this is a required field (This will be completed if using Finder File Lookup)
- Phone# - this is a required field
- PM # - this is not a required field
- Email Address - this is a required field if set as such on the script
Customer Payment Method
- Select the payment method by clicking inside the box that says "Choose Pay Type"
- If Credit Card,
- Click on Magnify glass
to display popup
- Click set Payment and enter the credit information in the popup ***FName, LName, and Email are required fields before being eligible to Set Payment***
- Click save to prepare order for payment - Token = Pending
- Token is set once pre auth is processed or order is submitted if no pre auth is required
- If Telecheck
- Enter the Bank Name - This is typically located above the notes/memo line on bottom left
- Routing # - The routing number is the nine-digit number printed in the bottom left corner of each check.
- Account # - Account number (usually 10 to 12 digits) is the second set of numbers printed on the bottom of each check
- Check if the check is for a Savings account
- Check # - Check number is the third set of digits found on the bottom of each check
- Bank City - This is typically located above the notes/memo line on bottom left
- Bank State - This is typically located above the notes/memo line on bottom left
- If Check
- The customer will read this off to you or it can be found in the upper right corner of the check or the last set of digits found on the bottom of the check
- If Money Order
- The Money Order Serial number is the 10- or 11-digit number found on the left side, below the date and on the bottom of the money order, or on the purchase stub
- If Invoice
- enter invoice number
- click Close
- If COD
- This is found on the shipping label
Shipping Method
Select the available Ship Method by clicking inside the box.
Hover over the question mark icon  to display chart of setup with shipping charges

The Shipping Profile must already be configured in OLX and set on the script.
Promo
Call Notes
- Notes
- Any notes that need to be made on the Customer record will go here
- Please note this will display on the Customer Detail Center and Order Detail Screen for current and future orders
- Demographic
- Information that is customer specific to help research customer demographics that are purchasing or calling about specific products
- If any Custom fields have been configured on the script you will also see those here
- Misc
- Any information that needs to be notated on the Packing Slip or (current order only) Order comments section will go here
Choose Product Offers
- If you do not enter anything in the Search bar all product offers available will display
- If you know which product offer you need to select you can type all or portions of the name into the Search bar
- entering text will begin the filtering
- you will see the count of filtered items go down with more characters entered into search field
- Search Fields
- All Fields
- Family Code (Product Group)
- Offer Code (Product Offer)
- Product Description
- Additional Order Type filters - these are determined based on Manage Scripts: Product Offers tab
- ORD
- ADD
- XSL
- CTY
- USL
- RSH
- Product Offers organized by Product Groups
- This icon
denotes a preauthorization is required on this product offer
- Hovering over the inventory icon
will display inventory details for that product offer
- once an offer is selected by checking the box, you will see qty displayed.
- clicking the minus
icon will lower the qty amount
- clicking the plus
icon will increase the qty amount
Order Summary/Totals Bar
- Hold Until
- option must be set on script before setting displays during order entry
- Coupon
- Enter the coupon to be applied to the order total
- Click Redeem
- Eligible Coupon
- click Apply button to add coupon
- click Cancel button to exit from coupon redemption
- Eligible Coupon but doesn't meet all requirements
- Non-Eligible Coupon
- Warning Icon
- If there are installments, you will see the warning icon letting you know how much of the total is due in order to place the order
- Open Script Window
- If Elements are configured on the script, you will see text in some or all of the sections below:
- Greeting Body
- This will only display texts designated for this section
- Objections
- This will only display texts designated for this section
- Close
- This will only display texts designated for this section
- Wrap Up
- This will only display texts designated for this section
- Current Script
- This drop down will allow you to select the main script or any subscripts attached to the main and then display the elements for the selected script.
- Subtotal
- S&H
- Tax
- Total
- Cart
- When you have entered all information, click the Cart button at the top of the products section of the screen.
- A wrap up window will appear.
Cart
Clicking on the Cart  icon will display the wrap up section:
- From here you will confirm the billing and shipping information as well as the product(s) selected.
- Choose Call Type from drop down if not already set
this is for reporting purposes:
- Customer Service
- Inbound
- Outbound
- The middle section will display each product selected for the order
- Offer - this field can be edited for qty
- Unit Price - depending on script setup this field may or may not be eligible to be edited
- S&H - depending on script setup this field may or may not be eligible to be edited
- unchecked - price will not be charged
- checked - price will be charged
- Rush - depending on script setup this field may or may not be eligible to be edited
- unchecked - price will not be charged
- checked - price will be charged
- Offer - this field can be edited for qty
- Choose a call disposition (if the call is a sale the system will automatically enter that disposition)
- Click the Process
button when you are ready preauthorize the order
- A Transaction Details window will popup and let you know if the order is approved or declined
It's important to note that only ONE preauthorization can be performed on an order. If a new item that requires a pre-auth needs to be added or if billing or shipping needs to be edited a new order will need to be placed. - Click the
 Submit button to create order
 - To return to the list of products, click the Go Back
button.
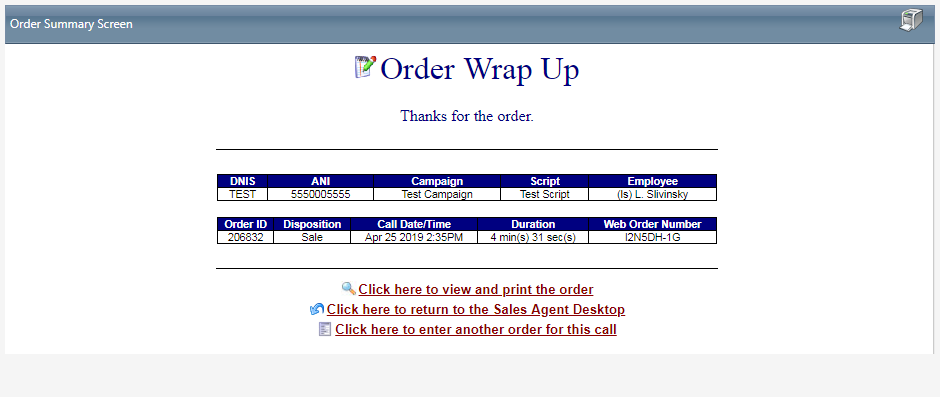
Order Summary Screen
Once submitted, a call/order confirmation screen appears letting you know the status of the call/order.
Classic Order Entry Prior to R21
Use the Sales Order Entry Screen to log a call, or enter a sale when you are talking to a customer.
Note: This manual call/order entry step does not occur if you are using the CTI feature in OrderLogix, because the system automatically brings you to the proper script.DNIS, Promo Code or Source Name
Navigate to Sales > Enter A New Sale or by clicking on the main Sales menu
- Select an option from the Choose Source dropdown - System Preference is where you will set the default option for this area
- DNIS ***must already be configured as a source in OLX***
- Promo ***must already be configured as a Promo in OLX***
- if Promo code is associated to more than one source a popup will display allowing agent to select source to create order against
- Source ***must already be configured as a source in OLX***
- Enter the value of Source option selected
- Enter the ANI if available (Customers telephone #) and
- Click the go button.
The Order Entry screen will appear. Navigate to Place Order.
Finder File Lookup
Navigate to Sales > Enter A New Sale You can not get here by clicking on the main Sales menu
- Enter either:
- Last Name and Zip Code (First Name can be used to help narrow down the returned records)
or - Finder #
- Click Lookup
- Click Go
- Select a DNIS from drop down
- Options displayed here will be based off the associations to the Finder File Customer Record selected in step 3
- Enter ANI if available (Customers telephone #)
- You can Choose again
- Click Go
- The Order Entry screen will appear with the Customer Information already filled in
- Navigate to Place Order below
Place Order Prior to R21

Order Entry Information
- DNIS - this connects the order to a source in OLX
- ANI - this is the call back information for the customer
- Rep# - this is the agent creating the order
- Order Date - day of order
- Order Time - time of order
- Timer - how long the order took to place
Customer Billing Information
- Company - this is not a required field
- Name (This will be completed if using Finder File Lookup)
- First - this is a required field
- Middle Initial - this is not a required field
- Last - this is a required field
- Address - this is a required field (This will be completed if using Finder File Lookup)
- Address 2 - this is not a required field
- City - this is a required field (This will be completed if using Finder File Lookup)
- State - this is a required field (This will be completed if using Finder File Lookup)
- Zip - this is a required field (This will be completed if using Finder File Lookup)
- Country - this is a required field (This will be completed if using Finder File Lookup)
- Phone# - this is a required field
- PM # - this is not a required field
- Email Address - this is a required field if set as such on the script
- Copy Billto Ship button
- a handy little short cut if the billing information is the same for the shipping information
Customer Shipping Information
Shipping address must be completed in order to calculate taxes
- Company - this is not a required field
- Name (This will be completed if using Finder File Lookup)
- First - this is a required field
- Middle Initial - this is not a required field
- Last - this is a required field
- Address - this is a required field (This will be completed if using Finder File Lookup)
- Address 2 - this is not a required field
- City - this is a required field (This will be completed if using Finder File Lookup)
- State - this is a required field (This will be completed if using Finder File Lookup)
- Zip - this is a required field (This will be completed if using Finder File Lookup)
- Country - this is a required field (This will be completed if using Finder File Lookup)
- Phone# - this is a required field
- PM # - this is not a required field
- Email Address - this is a required field if set as such on the script
Customer Payment Method
- Select the payment method from the dropdown
- If Credit Card,
- Click set Payment and enter the credit information in the popup ***FName, LName, and Email are required fields before being eligible to Set Payment***
- Click save to prepare order for payment - Token = Pending
- Token is set once pre auth is processed or order is submitted if no pre auth is required
- If Telecheck
- Enter the Bank Name - This is typically located above the notes/memo line on bottom left
- Routing # - The routing number is the nine-digit number printed in the bottom left corner of each check.
- Account # - Account number (usually 10 to 12 digits) is the second set of numbers printed on the bottom of each check
- Check if the check is for a Savings account
- Check # - Check number is the third set of digits found on the bottom of each check
- Bank City - This is typically located above the notes/memo line on bottom left
- Bank State - This is typically located above the notes/memo line on bottom left
- If Check
- The customer will read this off to you or it can be found in the upper right corner of the check or the last set of digits found on the bottom of the check
- If Money Order
- The Money Order Serial number is the 10 or 11 digit number found on the left side, below the date and on the bottom of the money order, or on the purchase stub
- If Invoice
- If COD
- This is found on the shipping label
Shipping Method
Select the available Ship Method from the drop down. The Shipping Profile must already be configured in OLX and set on the script.
Call Notes
- Notes
- Any notes that need to be made on the Customer record will go here
- Please note this will display on the Customer Detail Center and Order Detail Screen for current and future orders
- If using a Promo Code you will select from the drop down
- Demographic
- Information that is customer specific to help research customer demographics that are purchasing or calling about specific products
- If any Custom fields have been configured on the script you will also see those here
- Misc
- Any information that needs to be notated on the Packing Slip or (current order only) Order comments section will go here
Choose Product Offers Search Enabled
If Use Product Search is enabled on the scripts Details tab you will see the following for the Product Offers section:
clicking the Product Search  button will cause the product search page to popup
- If you do not enter anything in the Search Keywords bar and click the apply button all product offers available will display
- If you know which product offer you need to select you can type all or portions of the name into the Search Keywords bar
- click the Apply button to display available Product Offers
- Search In
- Product Group
- Product Name
- Product Description
- Script Name
- Results
- This icon
denotes a preauthorization is required on this product offer
- Hovering over the inventory icon
will display inventory details for that product offer
- Insert - will add selected products) to the Selected Product(s) section
- Cancel - will Xout of the popup without making any selections
Choose Product Offers Search Disabled
If Use Product Search is not checked on the scripts Details tab you will see the following for the Product Offers section:
- This area is organized by item type and then product group within each item type
- This icon
- Hovering over the inventory icon
Selected Products
This section will display each product selected for the order
- QTY - this field can be edited
- Unit Price - depending on script setup this field may or may not be eligible to be edited
- S&H - depending on script setup this field may or may not be eligible to be edited
- Rush - depending on script setup this field may or may not be eligible to be edited
Order Summary/Totals Bar
- Hold Until
- setting must be set on the script before being visible during order entry
- click on the calendar icon
to set the desired date
- clicking on a date outside the date range will display a popup letting the agent know the date selected is not allowed
- Subtotal
- S&H
- Tax
- value will update as items are added and/or removed
- Total
- Apply Coupon
- Enter the coupon to be applied to the order total
- Click Redeem
- Eligible Coupon
- Eligible Coupon but doesn't meet all requirements
- Non Eligible Coupon
- Warning Icon
- If there are installments you will see the warning icon letting you know how much of the total is due in order to place the order
- Process
- When you are ready pre authorize the order click the process button.
- A Transaction Details window will popup and let you know if the order is approved or declined
- Submit will process the preauth and take you to the wrap up screen
- Back To Order will allow you to go back to the order to remove the item if customer declines to make purchase or if a select few fields need to be edited.
It's important to note that only ONE pre authorization can be performed on an order. If a new item that requires a pre-auth needs to be added or if billing or shipping needs to be edited a new order will need to be placed.
- Wrap Up

- When you have entered all information, click the Wrap Up button underneath the products section of the screen.
- A wrap up window will appear.
Script Elements
If Elements are configured on the script you will see text in some or all of the sections below:
- Entire Script
- This will display all elements in order in one section
- Search
- Greeting Body
- This will only display texts designated for this section
- Objections
- This will only display texts designated for this section
- Close
- This will only display texts designated for this section
- Wrap Up
- This will only display texts designated for this section
- Current Script
- This drop down will allow you to select the main script or any subscripts attached to the main and then display the elements for the selected script.
Wrap Up Call/Order
Choose a call disposition (if the call is a sale the system will automatically enter that disposition) and enter any notes if necessary, then click the Submit button.
Submit button.To return to the list of products, click the  Products button.
Products button.Check here to learn how to Schedule Callback
Order Summary Screen
Once submitted, a call/order confirmation screen appears letting you know the status of the call/order.
The following elements appear in the Sales Order Entry screen:
Related Articles
Sales Order Entry_Order Header
Module : Sales Order Entry Topic : Order Header Version(s) : Version 5.1 and up Editions : Standard, Commerce, Call Center The Order Header contains basic information about the order. The header fields are automatically filled with data at the time ...Sales Order Entry_Shipping Method
Module : Sales Order Entry Topic : Shipping Method Version(s) : Version 5.1 and up Editions : Standard, Commerce, Call Center If the script is set up to use Shipping Methods, (which override the price of shipping attached to the product offers) ...Sales Order Entry_Product Information
Module: Sales Order Entry Topic: Product Information Version(s): Version 5.1 and up Editions: Standard, Commerce, Call Center What is the Sales Order Entry - Product Information? Sales Order Entry - Product Information is where you will see the ...Sales Order Entry_Shipping Information
Module: Sales Order Entry Topic: Shipping Information Version(s): Version 5.1 and up Editions: Standard, Commerce, Call Center Always follow your script when collecting data. You can copy the Shipping Information over from the Billing Information or ...Sales Order Entry_Billing Information
Module: Sales Order Entry Topic: Billing Information Version(s): Version 5.1 and up Editions: Standard, Commerce, Call Center Always follow your script when collecting data. The billing information is required for a Sale or Lead. All fields are ...