Move Inventory

Module: Inventory
Path: Company Data>Inventory>Move Inventory
Topic: Move Inventory
Version(s): Version 5.1 and up
Editions: All Editions
What Are Move Inventory
The move inventory screen allows inventory to be moved from one storage location to another. It also allows for changing how the inventory is stored. The interface is presented as a list of moves, where each individual move can first be added to the list and then applied. Navigate to Company Data>Inventory>Move Inventory.
Making The Connection
Where Will I See This Within OLX?
Changes made here will display on the Inventory Item List record.
What Reports Can Be Pulled?
- Inventory Item List Report Definitions
- Inventory Item Location Report Definitions
- Supplier Item Report Definitions
- Warehouse Report Definitions
- Supplier Purchase Report Definitions
- Inventory Item Association Report
What Imports/Exports Relate to Move Inventory
Trouble Shooting
Setup
Tool Bar
Utilizing the buttons on the tool bar  you can:
Print 
Minimize module 
Add New
The list starts out empty and will look like this:

Clicking the 'Add new record' button at the top of the list, adds a new row which represents one pending move:

Here is what the individual columns mean:
- SKU: This is the SKU that will be adjusted.
- Location: This is the storage location for the particular SKU that is selected. Only locations where the SKU is presently being stored will be displayed in this list. The unit of measurement information is also displayed in this drop down and represents how this particular item is being stored in the particular location.
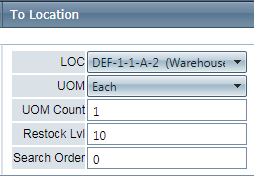
- To Location: This is the storage destination for the particular SKU that is selected. This list is a combined list of locations where this SKU is already stored, and empty warehouse locations where the SKU can possibly be stored. The interface will work a bit differently depending on which is selected.
- Item storage location (indicated by unit of measure information in the location text) This is a location where the SKU is already being stored. The unit of measure, as well as the count of items in that unit of measure cannot be changed as they are already defined for that location.
- Item storage location (indicated by unit of measure information in the location text) This is a location where the SKU is already being stored. The unit of measure, as well as the count of items in that unit of measure cannot be changed as they are already defined for that location.
- Warehouse location (indicated by the word “warehouse” in the location text) This is a location where the SKU has not been stored yet. If it is being stored here for the first time, additional parameters will need to be provided. Below is a screenshot along with definitions of the fields:

SKU is stored there. If the “To” location holds cases of 10, one box of twenty will become 2 cases of 10 in the destination location:

Regarding unit conversions, the interface will allow any conversion that can be physically done. The interface will display an error if it detects a conversion that cannot be performed. Here is some example scenarios of how conversion may be done:

Once all the fields have been filled, the line item can be saved by hitting the save icon at the beginning of the line. Multiple line items can be added, to move different SKU’s all at one time. The pending move can be edited by clicking on the edit pencil icon.
Finally, hitting the 'Apply Move' button at the bottom of the list will cause all the pending moves to be applied to the database. A green check mark will appear next to each successful move.

Note: In rare cases, a Red X will appear instead of a green check. This indicates that the move could not be made. If the actual inventory at a particular “From” location changed in the period of time that the moves were being defined, the proposed move may no longer be eligible. In such a case, this screen should be exited and then returned to in order to re-define the move
Copyright 2019
Revised 3.31.2025
Revised 3.31.2025
Related Articles
Adjust Inventory
Module: Inventory Path: Products>Inventory>Adjust Inventory Topic: Adjust Inventory Version(s): Version 5.1 and up Editions: All Editions What Is Adjust Inventory It is recommended to utilize the OLX Inventory Adjustment Import instead of making ...Inventory Item Association Report
Module: Reports Path: Reports > Inventory Reports > Inventory Item Association Report Topic: Inventory Item Association Report Version(s): Editions: What Is Inventory Item Association Report Inventory Reports Inventory Item Association Report - See ...Inventory Item List
Module: Inventory Path: Products > Inventory > Inventory Item List Topic: Inventory Items Version(s): Version 5.1 and up Editions: All Editions What Are Inventory Items The core element of the OrderLogix inventory system is the Inventory Item that ...410 - Inventory Warehouse Screen Fix
Version: 5.1 Patch: 410 Title: Inventory Warehouse Screen Fix Application Category: Other, Inventory Patch Type: Feature Description: Fixed error when assigning warehouse locations to an inventory item. Also expanded capacity to hold 50 characters of ...Inventory Item List Report Definitions
Module: Reports Path: Reports > Inventory Reports > Inventory Item Report Topic: Inventory Item Report Version(s): 5.1 and up Editions: All What Is Reports > Inventory Item Report - View inventory item data. This report shows inventory item ...