 Module: Campaign
Topic: BIN List Version(s): 5.1 & up Editions: All
What Is The OLX BIN List ImportThis import allows you to import lists of BIN lists that can allowed or disallowed during payment processing of a new order in your OrderLogix instance.
Making The Connection
Where Will I See This Within OLX?
Sales > Enter a new sale What Reports Can Be Pulled?
- at this time there are no reports that can be pulled
What Imports/Exports Relate to OLX BIN List Import
at this time there are no additional imports/exports related to BIN Lists
Trouble Shooting
order is not checking BIN List
SetupImport Configuration
Navigate to Processing > Import/Export > Imports
 - Category = Other
- Import Type = OLX BIN List Import
- Data Source
- Upload

- This will allow you to upload a file directly from the device you are working from
- Select Choose File to initiate a file window popup that will allow you to navigate to the specific file you are trying to upload
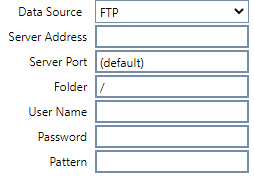
- FTP

- Server Address - This is the host name of the server where files will be collected from. An IP address can also be used.
- Server Port - This indicates the specific FTP/SFTP port to use. This is an advanced feature and should be left at (default) unless the FTP operator indicates that it should be something different.
- Folder - This indicates the relative folder on the remote server where the files should be gathered from. If this is unknown, the default of “/” should be used.
- User Name - This is the username for the remote server.
- Password - This is the password for the remote server.
- Pattern - Use the pattern field to specify which files are to be collected. Use the * (asterisk) as a wildcard to indicate any character or group of characters in the file name. For example, if the file to be collected is named “Acme_01-31-2012.PGP”, you could specify the pattern “Acme*.PGP”. This will attempt to collect all files that begin with “Acme” and end with “.PGP”. You may only use one * in the pattern field. The pattern must end in either .PGP or .GPG if the data being transferred is of a sensitive nature (as indicated by the selected imports specification)
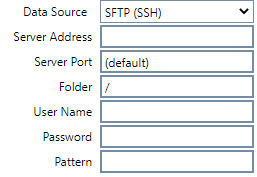
- SFTP (SSH)

- Server Address - This is the host name of the server where files will be collected from. An IP address can also be used.
- Server Port - This indicates the specific FTP/SFTP port to use. This is an advanced feature and should be left at (default) unless the FTP operator indicates that it should be something different.
- Folder - This indicates the relative folder on the remote server where the files should be gathered from. If this is unknown, the default of “/” should be used.
- User Name - This is the user name for the remote server.
- Password - This is the password for the remote server.
- Pattern - Use the pattern field to specify which files are to be collected. Use the * (asterisk) as a wildcard to indicate any character or group of characters in the file name. For example, if the file to be collected is named “Acme_01-31-2012.PGP”, you could specify the pattern “Acme*.PGP”. This will attempt to collect all files that begin with “Acme” and end with “.PGP”. You may only use one * in the pattern field. The pattern must end in either .PGP or .GPG if the data being transferred is of a sensitive nature (as indicated by the selected imports specification)
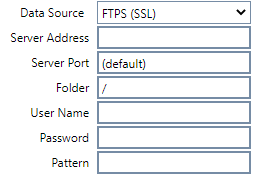
- FTPS (SSL)

- Server Address - This is the host name of the server where files will be collected from. An IP address can also be used.
- Server Port - This indicates the specific FTP/SFTP port to use. This is an advanced feature and should be left at (default) unless the FTP operator indicates that it should be something different.
- Folder - This indicates the relative folder on the remote server where the files should be gathered from. If this is unknown, the default of “/” should be used.
- User Name - This is the user name for the remote server.
- Password - This is the password for the remote server.
- Pattern - Use the pattern field to specify which files are to be collected. Use the * (asterisk) as a wildcard to indicate any character or group of characters in the file name. For example, if the file to be collected is named “Acme_01-31-2012.PGP”, you could specify the pattern “Acme*.PGP”. This will attempt to collect all files that begin with “Acme” and end with “.PGP”. You may only use one * in the pattern field. The pattern must end in either .PGP or .GPG if the data being transferred is of a sensitive nature (as indicated by the selected imports specification)
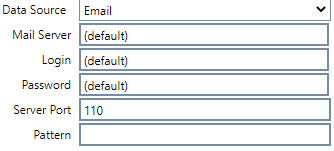
- Email

- Mail Server - The name of the email server you are using.
- Login - This is the user name for the mail server.
- Password - This is the password for the mail server.
- Server Port - Unless instructed otherwise this should be set to 110
- Pattern - Use the pattern field to specify which files are to be collected. Use the * (asterisk) as a wildcard to indicate any character or group of characters in the file name. For example, if the file to be collected is named “Acme_01-31-2012.PGP”, you could specify the pattern “Acme*.PGP”. This will attempt to collect all files that begin with “Acme” and end with “.PGP”. You may only use one * in the pattern field. The pattern must end in either .PGP or .GPG if the data being transferred is of a sensitive nature (as indicated by the selected imports specification)
Configuration Tab
- File Includes Header Row
- if the file you are importing contains headers check this box
- BIN List file name
- if you are importing a new file set the file name for the database here
- once file is imported this name will be listed in the drop down below (see Update existing BIN List file)
- Update existing BIN List file
- if you do not want to create a new file but want to update an existing file select the file to update from the drop down
 Notice this is to Update an existing file. You must import the whole file with changes/additions - this will not add single lines to the record selected, it will overwrite all data to the file you are importing. - Associate list to Client
- select one client to associate this file to
- this selection only applies to new files importing for the first time (see BIN List file name above)
- this selection will not overwrite when selecting a file from dropdown above (see Update existing BIN List file)
Decryption Tab
None
no decryption method will be used
- Zip
- the password entered here is the password needed to unzip the file and pull the information into the system

- PGP
- PGP Key Option - select the PGP from the drop down
- Verify passphrase - this must match the passphrase associated to the selected PGP above

Results Tab
Job starting...
Importing file named: BIN Lista.txt ----------------------------------------------
Total BIN list ranges added: 2
Job ran successfully.
The Results tab will display something similar to what you displayed above or if there are errors it will display information about the error to help you resolve and try again.
Global Script Rule
Navigate to Campaigns > Advertising > Global Script Rules > add new
- Rule Name = BIN List check
- Use for order entry
- checked - order entered manually will trigger rule
- unchecked - order entered manually will not trigger rule
- Use for imports
- checked - order imported from outside resource will not trigger rule
- unchecked - order imported from outside resource will not trigger rule
- Action
- Reject Order - order will not be allowed to create until rule is not triggered
- Hold Order for Review - order will create and move to item pending review, requiring agent to release order for processing
- Reason - this is what will display on customer record
- Client - client that rule will be required for
- Error Memo - this message will display to agents during order creation if rule is triggered
- If = unconditional
- add
- select unconditional from dropdown
- click save
- Then = must not be in [file]
- add
- select Credit Card BIN File from dropdown
- set BIN List name from drop down
- Allow Ranges Y/N
- checked - must be in [file]
- unchecked - must not be in [file]
- click save
- Scripts
- add scripts the rule will apply to or you can navigate to the script and add to each individually.
SIM Setup
On Sim there's an action
button that can be created
- navigate to the script using SIM
- edit script and navigate to Custom tab
- enable the desired custom field to display BIN List result on order after creation
- Label = BIN List result
- Require Sale = checked
- Data Type = ALPHA
- Min = 1
- Max = 5
- edit script and navigate to forms tab
- edit form to add BIN List check OR create new form
- create an action button in element
- click on the action button from form
- add new action - condition using OR
- Set Action Name = Yes in BIN List
- step #= 1
- add condition using OR
- click on add condition
- set dropdown to OR
- set drop down to Credit Card BIN File
- Select BIN LIST file from dropdown
- Allow Ranges
- checked - is in [file]
- unchecked - is not in [file]
- set action = Set Custom Value
- Field Name = select CustomField# associated to custom value that has been enabled on script
- Value = Yes
- add new action - condition using AND
- Set Action Name = NOT in BIN List
- step #= 2
- set condition using AND
- click on add condition
- set dropdown to AND
- set drop down to Credit Card BIN File
- Select BIN LIST file from dropdown
- Allow Ranges
- checked - is in [file]
- unchecked - is not in [file]
- set action = Set Custom Value
- Field Name = select CustomField# associated to custom value that has been enabled on script
- Value = No
- add new action -
- Set Action Name = Yes BIN List Message
- step #= 3
- add condition using OR
- click on add condition
- set dropdown to OR
- set drop down to Credit Card BIN File
- Select BIN LIST file from dropdown
- Allow Ranges
- checked - is in [file]
- unchecked - is not in [file]
- set action
- select Show Message from dropdown
- Message = This is a prepaid card. Prepaid cards can not be used with this campaign. Please ask for a credit or debit card number
- Type = Note with button
- add new action -
- Set Action Name = No BIN List Message
- step #= 4
- add condition using AND
- click on add condition
- set dropdown to AND
- set drop down to Credit Card BIN File
- Select BIN LIST file from dropdown
- Allow Ranges
- checked - is in [file]
- unchecked - is not in [file]
- set action
- select Show Message from dropdown
- Message = This is not a prepaid card.
- Type = Note with button
Spec
The OLX BIN List Import allows for loading defined ranges of credit card numbers into the OrderLogix application for order restrictions or allowances.
ASCII text. The file must contain one line per addition, with each field enclosed in double quotes and comma separated, ending with a Carriage Return (↵) <CR>. All unused fields will be left blank and remain separated by a single comma.
File Naming:
<Organization Identifier><YYYYMMDD>.csv
|
Import Definitions:
# | Field Name | Req. | Type | Max | Field Description | 1 | START SIX DIGITS | YES | Numeric | 6 | The first 6 digits of the beginning of the range. | 2 | END SIX DIGITS | YES | Numeric | 6 | The first 6 digits of the ending of the range. |
|
Attachments
The attached documentation includes the OLX BIN List Import Spec, Template, and Example.
| 
