SIM - Adding/Editing/Moving Elements
 Module : SIM Elements
Path: Campaigns > Advertising > SIM Elements
Topic : Adding/Editing/Moving Elements
Version(s) : Version 5.1 and up
Editions : All Editions
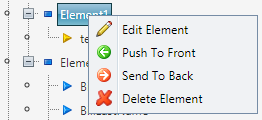
To add an element you can click on the Add Element button or right click the ‘Form’ node, Header/Footer node, or any column node and select ‘Add Element’. To edit a column you can double click the element node or right click the element node and select ‘Edit Element.
This will open the Add/Edit Element window:
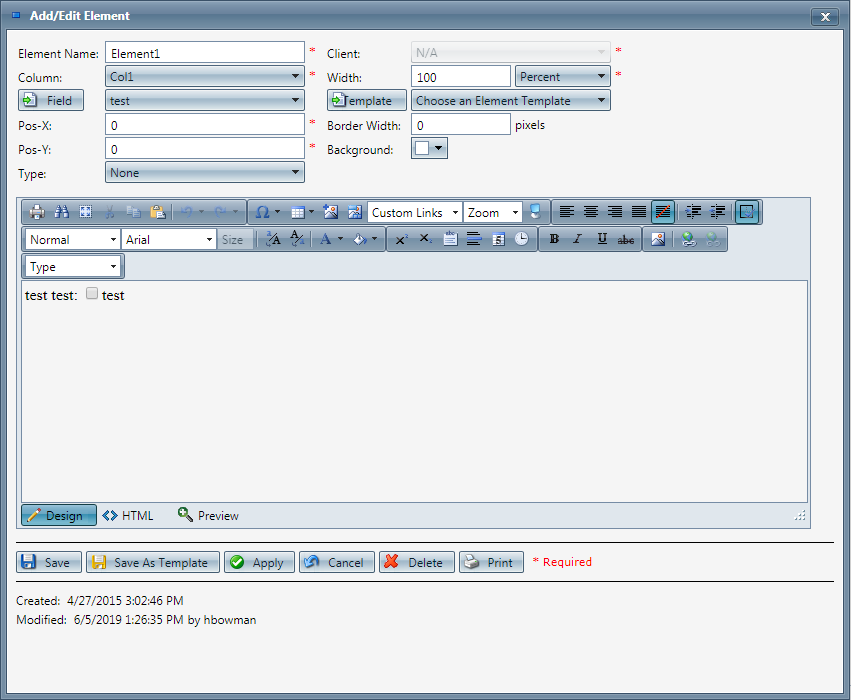
There are some familiar selections in this popup that can be seen in the add/edit column pop up, such as width/width units (percent or pixels), border width and background color. These fields operate the same way. Some new fields are explained below:
- The Element Name will be defaulted to a generic name, however you can modify to be more specific.
- Column - If you open the add/edit element window by clicking the add element button or from the top ‘Form’ node, you will need to select a column to attach the element to. You can also change the column if you want to move the element.
- Global Elements - If you have created global elements (more information below) you can select them in this screen. Once you choose the global element from the drop down list, you can click the insert element template button, and all of the information from the global element will be populated in the body of this element. You can make any changes desired, without modifying the existing global element. Any changes will only be specific to the element you are adding/editing.
- Fields - This drop down menu contains all the form specific custom fields, global custom fields, OLX informational fields and OLX data fields that can be inserted into the element. The different types are designated using the different colored flags described in the SIM Form Designer section. To insert a field into your element, select it from the drop down list; and click the insert field button. It will then be added to the design pane. Based on the type of field you insert, you could be prompted with another dialog box:
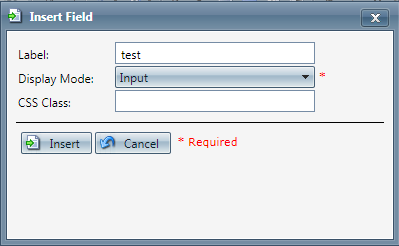
- You enter a label as it will appear before the field in the design pane (not required). The display mode will either be input, label or button.
 Note: If the field is a button you cannot modify the display mode.If you select input then the field will be able to be edited. If you select label, the value will appear but cannot be modified; it is informational only. The OLX information fields will always have a display mode of label.
 - Type (A & B) - You can designate a "type" for an element, or specific text inside an element. This will surround the text with an outline and insert one of the three following images:

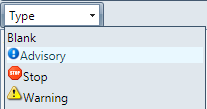
- If you have selected a type you also have the option to enter ‘Legend Text’ which is what will appear above the icon. A sample is shown below:

- Design/Preview Pane - This is the area you will enter the text and element fields. You can also apply formatting using the icons above the area. To see how it will look in an actual window you can click on the Preview button at the bottom.
- Position - The elements will be positioned relative to the top left corner of the column they belong to. They can also be moved after they are saved to position them, by clicking on the element node you want to move in the tree. A black dotted border will appear around the element, and you can use the arrow keys to move it five pixels at a time. Holding down the shift key and using the arrows will move the element one pixel at a time:

- You can also move elements to the foreground or background by right clicking on the element node and selecting ‘Push to Front’ or ‘Send to Back’.
- Save as Global - If you want to save the element you have created to be used as a global element you can click the ‘Save as Template’ button. This will save a copy of the element as a global element, any changes you make after that will still be to the form specific element.
- You can delete an element opening the Add/Edit Element window and clicking the Delete button, or by right clicking on the element and selecting ‘Delete Element’.
SIM - Adding/Editing/Moving Elements
Copyright 2019
Revised 6.19.2019
Related Articles
SIM - Adding/Editing Columns
Editing the Header/Footer By default the header and footer will have a height of zero pixels which will make them invisible when rendered. To edit the height of the header or footer you can double click the header/footer node on the form tree or ...SIM - Adding/Editing Custom Fields
Module : SIM Elements Path: Campaigns > Advertising > SIM Custom Fields Topic : Adding/Editing Custom Fields Version(s) : Version 5.1 and up Editions : All Editions You can create form specific custom fields, to capture and display additional ...SIM - Data Linked
Module: SIM Path: Campaign > Advertising > Maintain Scripts > Forms tab Topic: Edit Element Version(s): 5.1 & up Editions: Commerce and Call Center Linked Field The data-linked attribute is used to store custom data private to the (sim form). The ...SIM - Action Button Types
Module: SIM Path: Campaign > Advertising > Maintain Scripts > Forms tab Topic: Edit Element Version(s): 5.1 & up Editions: Commerce and Call Center Action Button Types Action buttons allow you to configure specific events/actions to trigger based off ...Adding Images Within Notifications
Module: Notification Path: Processing > Notifications > Notification Setup Topic: Adding Images to Notifications Version(s): All Editions: All Images are a great way to make your notifications grab more visual attention. Please follow the following ...