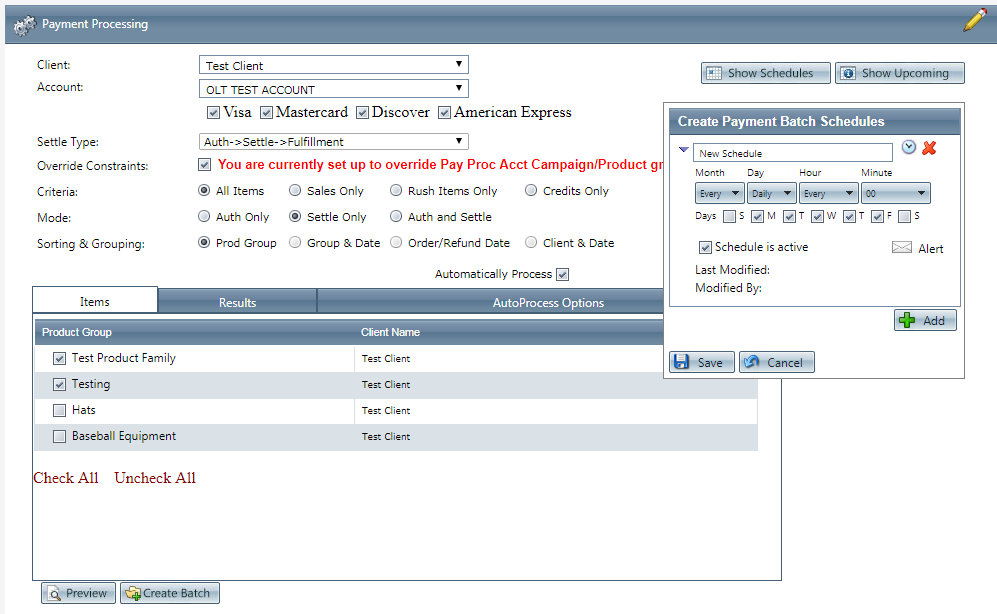
Payment Batch Schedules
Navigate to Processing>Payment Processing>Create Payment Batches. When you click on the Show schedules button you will see the standard batch creation options:

- Make all appropriate selections for the batch that the schedule will create. Select the Client, Payment Processing Account, Settle Type, Criteria, Mode, Sorting and Grouping and then load your options.
- You will see all of the product groups displayed based on the client that you have chosen. Check which of the product groups should be eligable for the batch schedule you are creating.
- If you intend to have the payment batch that the schedule is creating, automatically process after creation; you need to check off the appropriate box.
For general Schedule set up instructions, please see Automated Schedules.
- Click the Save button, the changes will be saved and the Edit Schedule window will close.
- To cancel any of the current changes you have made, click the Cancel button. This will close the Edit Schedule window without saving any changes.
Related Articles
How to Determine When to Schedule the Payment Processor
Module: Payment Processing Processing > Payment Processing > Create Payment Batches Topic: When to Schedule Payment Batches Version(s): All Editions: All When you have multiple payment processors it can seem confusing determining how to setup a ...Export Schedules
Module : Export Schedules Topic : Module Overview Version(s) : Version 5.1 and up Editions : Standard, Commerce, Call Center Navigate to Processing>Import/Export>Exports. When you click on the Show schedules button you will see some specific ...Import Schedules
Module: Import Schedules Topic : Module Overview Version(s) : Version 5.1 and up Editions : Standard, Commerce, Call Center Navigate to Processing>Import/Export>Imports. When you click on the Show schedules button you will see some specific ...Batch Rollback Authorization Form
Batch Rollback Authorization Form From time to time a mistake may be made when creating batches. In many cases, we can roll back the batch for you, giving you the opportunity to recreate it. Please note that this is a billable task and by invoking ...Process Payment Batches
Module: Process Payment Batches Path: Processing > Processing > Payment Processing Topic: Process Payment Batches Version(s): 5.1 & up Editions: All What is Payment Batch Processing? Payment Batch Processing is when you send a created payment batch ...