How to Set Default Columns for the Datawarehouse Export and the Flattened Export
The Datawarehouse Export and the Flattened Export are both very valuable reports in OrderLogix because they allow you to retrieve data in many different combinations, some of which may not be available from other default reports. These reports allow you to select from several different date filters, item statuses, and product values as well as allowing you to select exactly which columns you would like displayed.
If your organization utilizes these reports for the same information often, you may wish to set default columns. This will allow you to simply set your desired filters and run the export without having to configure the columns that you require.
To set default columns, navigate to Company Data-->Company-->System Preferences and click the green edit pencil beside your organization's name to open the Edit System Preferences window. In this window, click on the System/Autoships tab at the top and find the "Edit default warehouse columns" sections toward the bottom of the window, as displayed below:
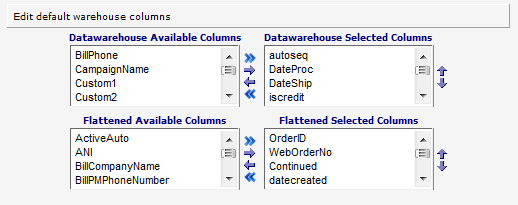
The top two boxes are for the Datawarehouse Export and the bottom two are for the Flattened Export. Utilize the arrows (->, <-) or the double arrows (>>, <<) to move column names between the Available box to the left and the Selected box to the right and the up and down arrows to move column names into the order you would like them displayed in the Selected box. Once you have the columns configured the way you would like, click Save on the window to set your changes.
Please note that these default configurations will be applied to all users in your organization.
If you have any further questions regarding setting default columns for the Datawarehouse and Flattened Exports, please contact OrderLogix Customer Care. Thank you!
Related Articles
SIM - Adding/Editing Columns
Editing the Header/Footer By default the header and footer will have a height of zero pixels which will make them invisible when rendered. To edit the height of the header or footer you can double click the header/footer node on the form tree or ...Export Schedules
Module : Export Schedules Topic : Module Overview Version(s) : Version 5.1 and up Editions : Standard, Commerce, Call Center Navigate to Processing>Import/Export>Exports. When you click on the Show schedules button you will see some specific ...Shopify Order API Export
Module: Export Path: Processing > Import/Export > Exports Topic: Shopify Order API Export Version(s): 5.1 & Up Editions: All What IS Shopify Order API Export Shopify Order API Export allows you to export orders from your OLX instance into Shopify. ...Shopify Ship Confirmation Export
Module: Export Path: Processing>Import/Export>Exports Topic: Shopify Ship Confirmation Export Version(s): 5.1 & up Editions: All What Is Shopify Ship Confirmation Export The Shopify Ship Confirmation Export is used to pass payment and fulfillment ...Action > Set Offer Attributes
Module: SIM Path: Campaign > Advertising > Maintain Scripts > Forms tab Topic: Interactive Action Settings Version(s): 5.1 & up Editions: Commerce and Call Center Action > Set Offer Attributes On the Form view, clicking on a user defined button ...