Braintree - Payment Processing Account Token Generation
 Module: Braintree Payment Processing Account Token Generation
Topic: Braintree Payment Processing Account Token Generation
Version(s): Version 5.0
Editions: All Editions
What Is Braintree
What Is Tokenization
Making The Connection
Where Will I See This Within OLX?
- Manage Scripts > Script Properties
- Order Entry > Submit Transaction Popup
- Order Detail
- Create Payment Batches
- Order Import
- RMA's
What Reports Can Be Pulled?
What Imports/Exports Relate to xxxx
Trouble Shooting
- Agent receives error during order entry - Object variable or With block variable not set.
- check settings on gateway for Card Verification before storing the card in the vault.
- A token can only be used in the account is created in.
- A payment profile that has been tokenized will fail payment processing if attempting to process payment in any other payment account
Setup
There are multiple places within OrderLogix to take into consideration when it comes to generating and managing tokens, so the first place would be to set up the payment processing account that the tokens will be created through. This article will show you how to set up and manage this feature for the "Braintree" payment gateway.
Payment Processing Account Set up:
 edit pencil icon next to the one you are modifying or the
  add new button to create a brand new account:
The labels for each field under the selected payment processor are specific to values needed to be passed to the gateway for a token to be generated and will vary depending on what processor you are integrating with.
The payment processing account settings for Braintree contain values that allow the user to determine whether or not the CVV is displayed in the payment window on the order screen for AVS verification, when manually generating a token in OrderLogix. You will want to verify in your Braintree portal whether or not these fields are required in order to generate a token. The field labeled "Show CVV(1/0)" has acceptable values of "Yes", "1", "true" for active, and "No","0","false" for inactive.
Once you enter all of the required fields for the account, and ensure that the "Allow Tokenization" checkbox is selected you can save the settings and then move onto associating to desired script(s).
Where to Find The Values in Braintree
- Login to your Braintree Gateway account.
- Click on the gear (settings)
top right of Home screen
- Merchant Account ID
- Settings > Business > Merchant Account > Merchant Account
- Show CVV
- Settings > API
- Tokenization Key
- Settings > API > Keys > Tokenization Keys
- Merchant ID - Can be found in 2 places
- Settings > Business > Merchant Accounts > Merchant ID
- Settings > API > API Keys > click View
- Enter 0 Here
- Settings > API
- API Public Key
- Settings > API > Keys > API Keys
- API Private Key
- Settings > API > Keys > API Keys > click View
- Confirm Password - Re-enter the API Private Key
Maintaining Scripts:
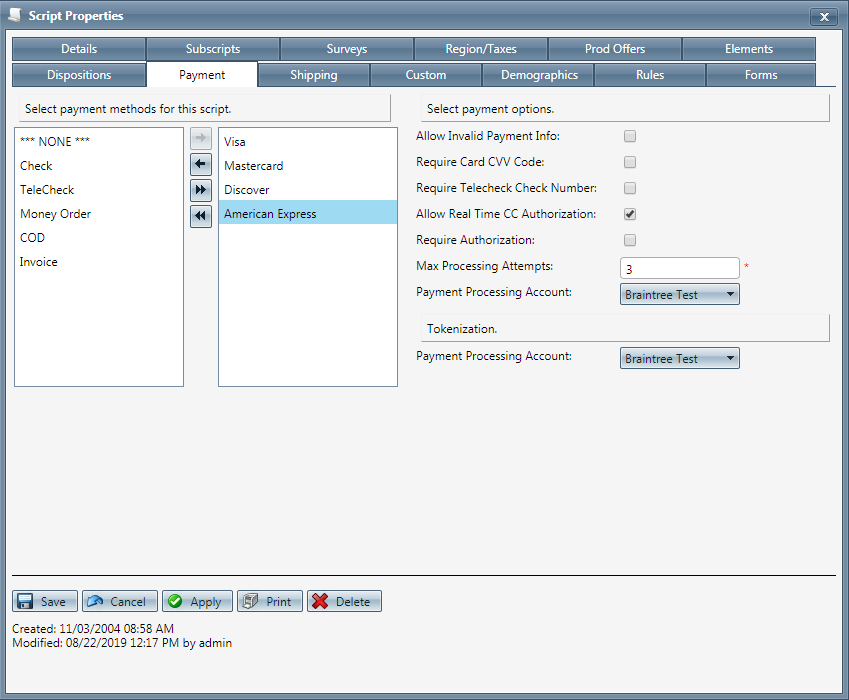
You will notice when you allow real time auth for pre-authorizations, not only does the standard "payment processing account" display but now there is also a "payment processing account" for tokenizations and these MUST be the same. If you have 2 different accounts selected, you will see the following message appear:

Once you have the braintree account selected for the desired script(s) then tokens can be created from the order entry screen when manual orders are submitted.
Order Entry:
 "Set Payment." You will only see this option when tokenization is activated for a script:
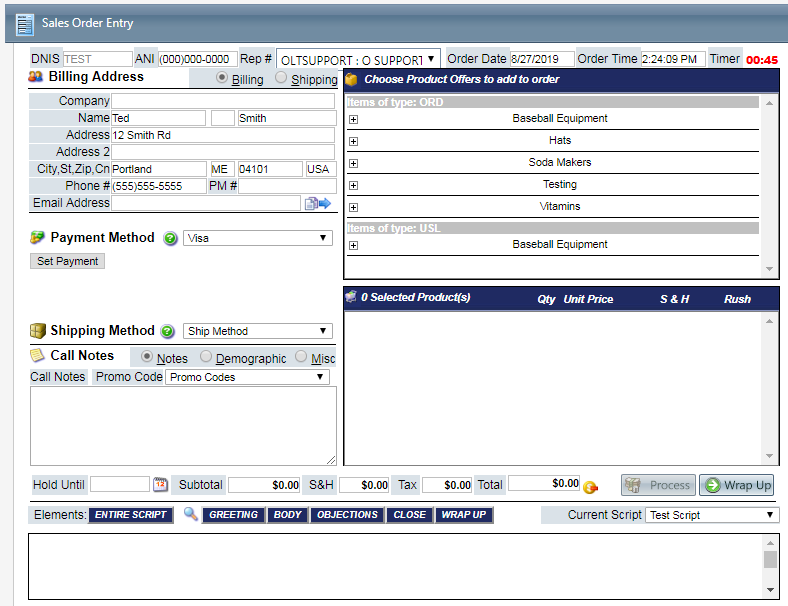
Once the "set payment" button is selected, the following payment information window will pop up:
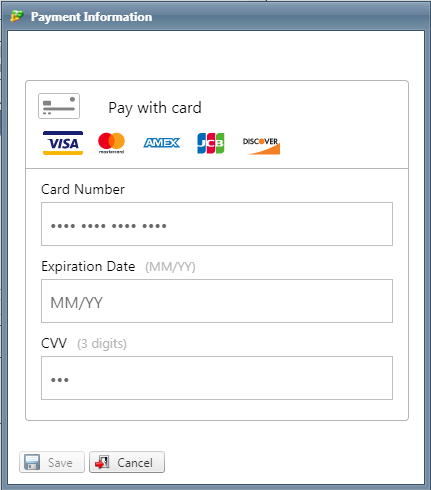
Note: Whether or not the CVV and or the zip code fields will display in this payment window depends entirely on how the settings are established for the account. In the screenshot at the beginning of this article it displays those fields with either a value of 1 for yes to show the field in the payment pop up, or a value of 0 not to show it.
All of the fields that are displayed in the pop up are required, and must be filled out before the "save button" can be selected. Once you save the payment information screen, a token will be pending for the customer's information and then generated once the order has been pre-authed or submitted if pre-auth isn't enabled on the script:
If the customer wishes to change their method of payment, before the pre-auth or submission is conducted you can simply click back on the "set payment" button in order to wipe the slate clean and enter new information. Keep in mind that when accessing the payment information a second time on the order screen, you will not see what the previous information was only a blank screen for you to enter new information.
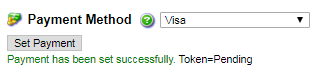
If the script enables pre-authorizations, the token will be returned and displayed under the Payment Method selection before submitting it:

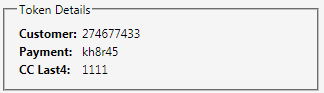
The customer and payment values are generated at the payment processor level, and displayed in OLX within the token value which also contains the last 4 numbers of the CC. Now we will take a look at how this information is displayed on the customer's order screen, when it's not broken out and how customer service will manage tokens within payment profiles.
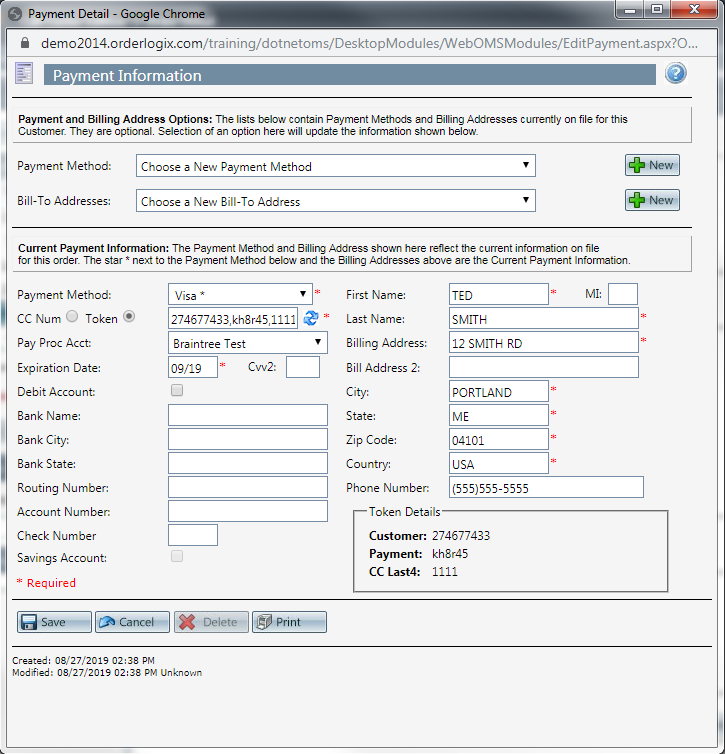
Order Detail Screen:

If a change needs to be made to the payment information, and the item(s) on the order are in eligible status(es) then you can click into the  edit pencil icon in order to modify the payment data. The Payment Information window will pop up, displaying the current token details:
If a new token for the order needs to be generated then you will click the  "generate new token" icon located beside the current token, which will then launch the same payment information screen that we saw on the order entry screen. This allows you to enter brand new information in order to create a new token for the order, and will show pending until the response comes back from the processor:
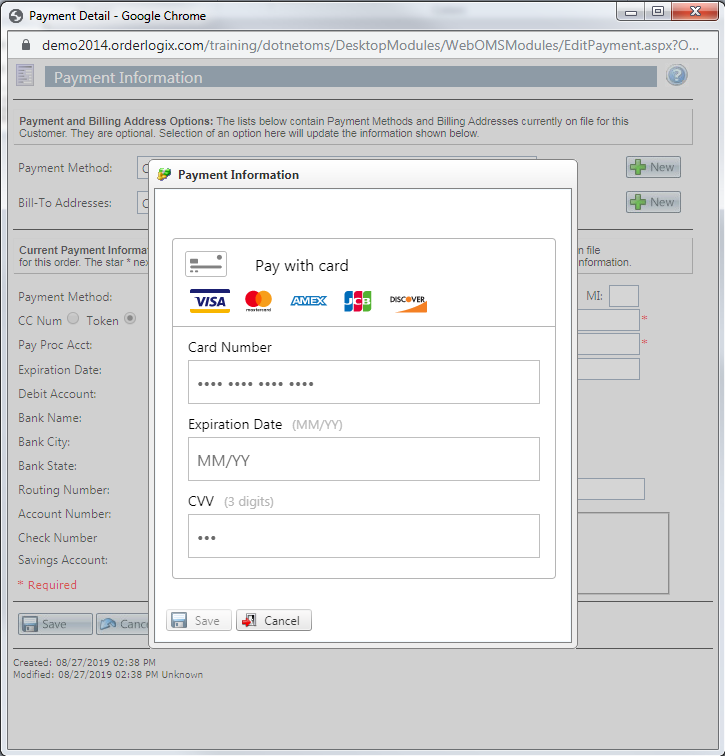
You will then see that the "token details" located at the bottom of the payment information window will be updated as well:
Customer Detail Screen:
Customers that have tokens applied to orders will have this information securely stored on their detail center in the payment profile section, for use on future continuity and or one time orders. Once viewing the payment profile tab, you will see all profiles stored for a given customer and a "dummy" credit card number will be applied to the "credit card number" field in the profile based on the details stored in the system preferences section. This is necessary due to the CC details being required on order, however if a token is present that will trump the card number. The token will be visible to the right hand side of the payment profile details:

If the profile needs to be modified, click the edit pencil icon and the "edit payment profile" window will appear as seen below:
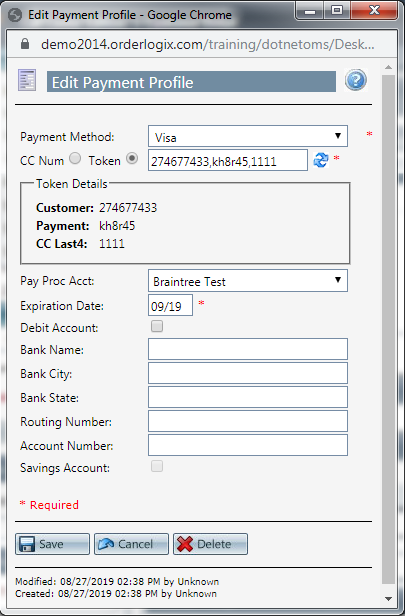
Generating a new token for the profile will work the same way as shown in the order detail section of this article.
Importing orders with tokens:
- - the method of payment = CC.
- - the credit card type.
- - a placeholder credit card number (see list of card numbers that will pass a mod10 check here, and instructions for setting the placeholder card numbers for tokenized accounts here).
- - the credit card expiration date.
- - the name of the Payment Processing Account, as set up in OrderLogix.
OrderLogix API Details:
The Billing Agreement ID will be passed in the XML element.
The name of the Payment Processing Account will be passed in the XML element.
The method of Payment (CC) will be passed in the XML element.
The credit card type will be passed in the element.
The placeholder credit card number will be passed in the XML element.
The card expiration date will be passed in the XML element.
Example:
CC
V
4111111111111111
05/25
36X589623563,4qN3r4e7dj,9876
PayPal Express Checkout
Payment Gateways will have different formats of information that needs to be passed in the token field, please see integrated list formats below:
Braintree Gateway:
Braintree - Payment Processing Account Token Generation
Copyright 2019
Revised 10.2.2019
Related Articles
Stripe - Payment Processing Account Token Generation
Module: Payment Processing Account Topic: Stripe Payment Processing Account Token Generation Version(s): Version 5.1 Editions: All Editions What Is Stripe Stripe is a payment gateway that processes the various credit cards and tokenization. What Is ...Authorize.Net - Payment Processing Account With Tokenization
Module: Payment Processing Account Topic: Authorize.Net Payment Processing Account with Tokenization Version(s): Version 5.1 & up Editions: All Editions Setup The Payment Processing Account Token Generation feature is optional and turned on by ...NMI - Payment Processing Account With Tokenization
Module: Payment Processing Account Topic: NMI Payment Processing Account with Tokenization Version(s): Version 5.1 & up Editions: All Editions Tokenizing Your Payments The Payment Processing Account Token Generation feature is optional. This feature ...Action > Set Payment Processing Account
Module: SIM Path: Campaign > Advertising > Maintain Scripts > Forms tab Topic: Interactive Action Settings Version(s): 5.1 & up Editions: Commerce and Call Center Action > Set Payment Processing Account On the Form view, clicking on a user defined ...Payment Processing Account Volume Caps
Module: Payment Processing Accounts Topic: Volume Caps Version(s): Version 5.1 and up Editions: All Editions Payment Processing Accounts have the ability to enable Daily and Monthly Processing Volume limits, which allows you to control how much ...